Building a Reliable Campfire in Wet Conditions

What You'll Learn About Wet Wood Fire Building
This guide covers the specific methods for starting a fire when your fuel source is damp or even soaked. You'll learn how to identify usable wood, how to prepare a platform to keep your heat source off the ground, and how to select the right kind of tinder to ensure a successful burn even when the weather isn't cooperating.
Most people assume a little bit of rain or a damp forest floor means the end of a cozy evening. That's rarely the case. If you know where to look and how to prepare your fuel, you can keep a flame going regardless of the humidity. The secret isn't just about the spark; it's about the preparation and the structure of the fire itself.
Where Do I Find Dry Wood in a Damp Forest?
When everything looks soaked, your first step is looking up. The most reliable fuel in a wet environment is found in the middle of a tree. Dead branches that are still attached to living trees—often called "deadfall on the branch"—are much drier than anything sitting on the ground. These branches haven't been sitting in the mud or soaked by ground-level runoff. They've been protected by the canopy above.
Look for the "snap test." Take a small twig and bend it. If it bends without breaking, it's still full of moisture and will be a nightmare to burn. If it snaps cleanly with a sharp sound, it has a lower moisture content and is a better candidate for your kindling. This is your first line of defense against a failed fire. If you can't find anything that snaps, you're going to need much more vigorous preparation.
Another trick is looking for the underside of fallen logs. The bark acts as a natural waterproof layer. If you peel back a bit of bark or split a log, the wood underneath is often still bone-dry. This internal wood is what will actually sustain your fire once you get the initial flame established.
How Do I Start a Fire on Wet Ground?
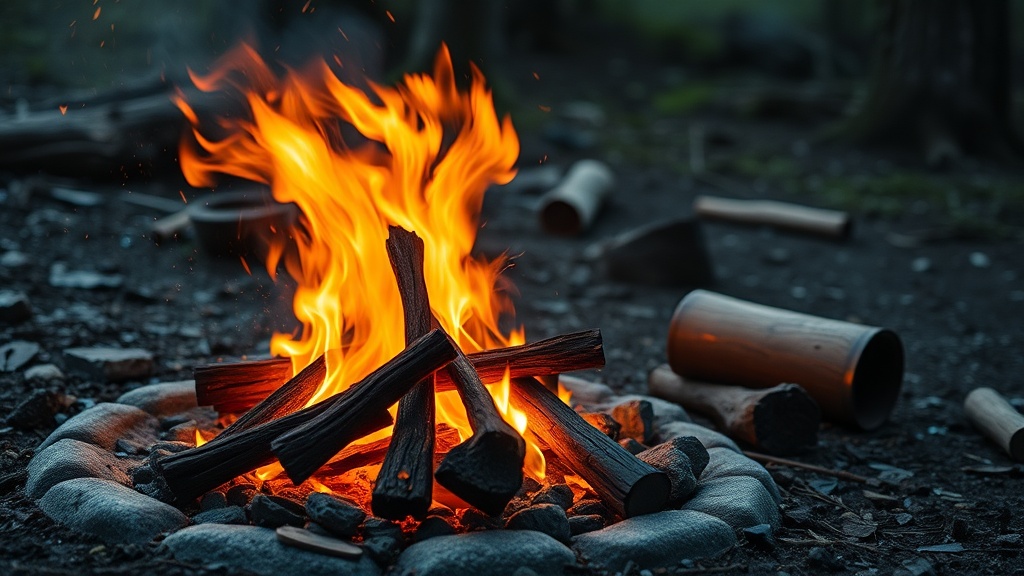
The biggest mistake beginners make is building a fire directly on top of the earth. Damp ground will suck the heat right out of your coals, and the moisture from the soil will rise into your flames, effectively quenching them. You need to build a platform first. This is a way to insulate your fire from the wet ground and create a dry base.
- The Platform Method: Lay down a layer of thick, green logs or even flat stones to create a raised surface. This prevents the heat from being lost to the mud.
- The Log Cabin Method: Build your fire on top of this platform. By elevating the ember stage, you ensure that the heat stays concentrated where you need it.
- Stone Bases: If you have access to large, flat rocks, use them to create a heat-reflective wall. This helps bounce the heat back toward your sitting area.
A reliable platform makes a huge difference. Without it, you're fighting an uphill battle against the thermal conductivity of the wet ground. You're essentially trying to build a fire on a heat sink, which is a recipe for frustration.
What Kind of Tinder Works Best in the Rain?
Standard wood shavings won't cut it when the air is thick with moisture. You need something that catches easily and stays lit long enough to dry out your larger kindling. If you're out in the wild, look for natural materials that are naturally oily or resinous. Pine resin or even dried-out bird nests (if found safely) can act as natural fire starters.
If you're packing gear, I always suggest bringing a small amount of high-quality, waterproof tinder. Cotton balls soaked in petroleum jelly are a classic for a reason—they work. But if you're relying on what's around you, look for the inner bark of certain trees or the pith of dead branches. The pith is the soft, spongy center of many branches; it can be shaved into thin strips that burn quite well even when the exterior is damp.
Remember, your tinder's only job is to bridge the gap between a tiny spark and your larger kindling. It needs to be highly flammable and capable of producing enough heat to dry out the next layer of wood you add to the pile. If your tinder is too weak, the fire will die before it ever reaches the sticks you've prepared.
The Progression of Fuel Sizes
A successful fire follows a strict hierarchy. You can't just throw a big log on a tiny flame and expect results. You need to move through these stages carefully:
- Tinder: The tiny, highly flammable material (resin, shavings, or cotton).
- Kindling: Small twigs, roughly the size of a toothpick or a pencil.
- Small Sticks: Branches about the thickness of your thumb.
- Fuel Wood: The larger logs that will sustain the heat for hours.
The transition between these stages is where most fires fail. If you add your "small sticks" too early, they will soak up all the energy from the tinder and extinguish the flame. Wait until the kindling is actually glowing and producing heat before adding the next layer. It requires patience—more than most people want to exercise in the cold.
For more detailed information on wilderness survival and outdoor safety, check out the resources at the National Park Service or review the safety guidelines provided by the REI Expert Advice sections. These sources provide a wealth of knowledge regarding environmental awareness and safety in the backcountry.
Common Pitfalls to Avoid
One of the most common errors is overcrowding the fire. When you're trying to get a fire going in wet weather, you'll be tempted to pile on more wood to create more heat. This is actually the opposite of what you should do. Too much wood creates a "smothering" effect where the oxygen can't reach the tiny flames, and the moisture in the wood creates a cloud of steam that puts the fire out.
Instead, keep your pile small and focused. A small, intense heat is much more effective at drying out your fuel than a large, struggling pile of wet sticks. Once the fire is established and the core is hot, you can gradually add larger pieces. If you see a lot of white smoke, that's a sign of moisture burning off; keep going, but don't add more wood until the smoke turns gray or clear.